こんにちは。
今回はFlutterアプリケーションで画像表示と画像加工について簡単にまとめたいと思います。スマホアプリ開発に関わらず、画像表示はアプリケーションにおける基本の「き」かと思うのでこの機会にまとめておきます。
前提
今回は初期のカウンターアプリ(少し改修を加えています)に画像を表示していきます。
import 'package:flutter/material.dart';

void main() {
  runApp(const MyApp());
}

class MyApp extends StatelessWidget {
  const MyApp({super.key});

  @override
  Widget build(BuildContext context) {
    return MaterialApp(
      title: 'Flutter Demo',
      theme: ThemeData(
        colorScheme: ColorScheme.fromSeed(seedColor: Colors.blueAccent),
        useMaterial3: true,
      ),
      home: MyHomePage(title: 'Flutterヘッダー'),
    );
  }
}

class MyHomePage extends StatefulWidget {
  const MyHomePage({super.key, required this.title});

  final String title;

  @override
  State<MyHomePage> createState() => _MyHomePageState();
}

class _MyHomePageState extends State<MyHomePage> {
  int _counter = 0;

  void _incrementCounter() {
    setState(() {
      _counter++;
    });
  }

  void _decrementCounter() {
    setState(() {
      _counter--;
    });
  }

  @override
  Widget build(BuildContext context) {
    return Scaffold(
      appBar: AppBar(
        backgroundColor: Theme.of(context).colorScheme.inversePrimary,
        title: Align(
          alignment: Alignment.centerLeft,
          child: Text(widget.title),
        ),
        actions: <Widget>[
          IconButton(
            icon: const Icon(Icons.add),
            onPressed: _incrementCounter,
          ),
        ],
      ),
      body: Center(
        child: Column(
          mainAxisAlignment: MainAxisAlignment.center,
          children: <Widget>[
            const Text(
              'Hello Flutter!',
              style: TextStyle(
                fontSize: 24,
                fontWeight: FontWeight.bold,
              ),
            ),
            const Text(
              'カウンターが1ずつ増加します',
            ),
            Text(
              '$_counter',
              style: Theme.of(context).textTheme.headlineMedium,
            ),
          ],
        ),
      ),
      floatingActionButton: Row(
        mainAxisAlignment: MainAxisAlignment.end,
        children: <Widget>[
          FloatingActionButton(
            onPressed: _decrementCounter,
            tooltip: 'Decrement',
            child: const Icon(Icons.remove),
          ),
          const SizedBox(width: 10),
          FloatingActionButton(
            onPressed: _incrementCounter,
            tooltip: 'Increment',
            child: const Icon(Icons.add),
          ),
        ],
      ),
    );
  }
}
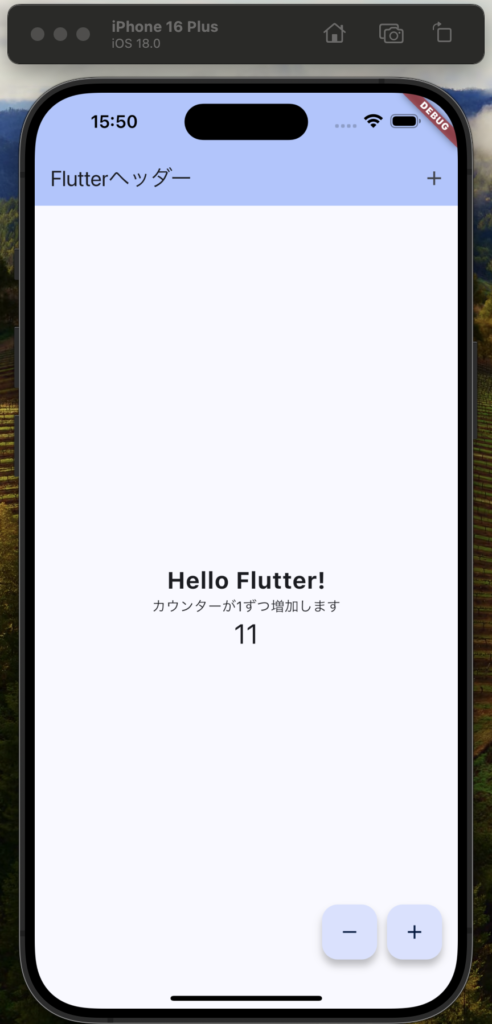
インターネットにある画像の表示
まずはインターネットにある画像の表示方法から見ていきます。
デフォルトのコンストラクタを使用する場合
デフォルトのコンストラクタを使用する場合、以下のように記載することができます。Imageクラスのデフォルトコンストラクタを使い、imageプロパティにImageProviderを指定しています。(NetworkImageはインターネット上の画像を表示するためのImageProviderの一種です。)
他のImageProvider(AssetImageやFileImageなど)も使えるため、柔軟に画像のソースを指定することができます。
const Image(
image: NetworkImage(
'https://flutter.github.io/assets-for-api-docs/assets/widgets/owl.jpg'),
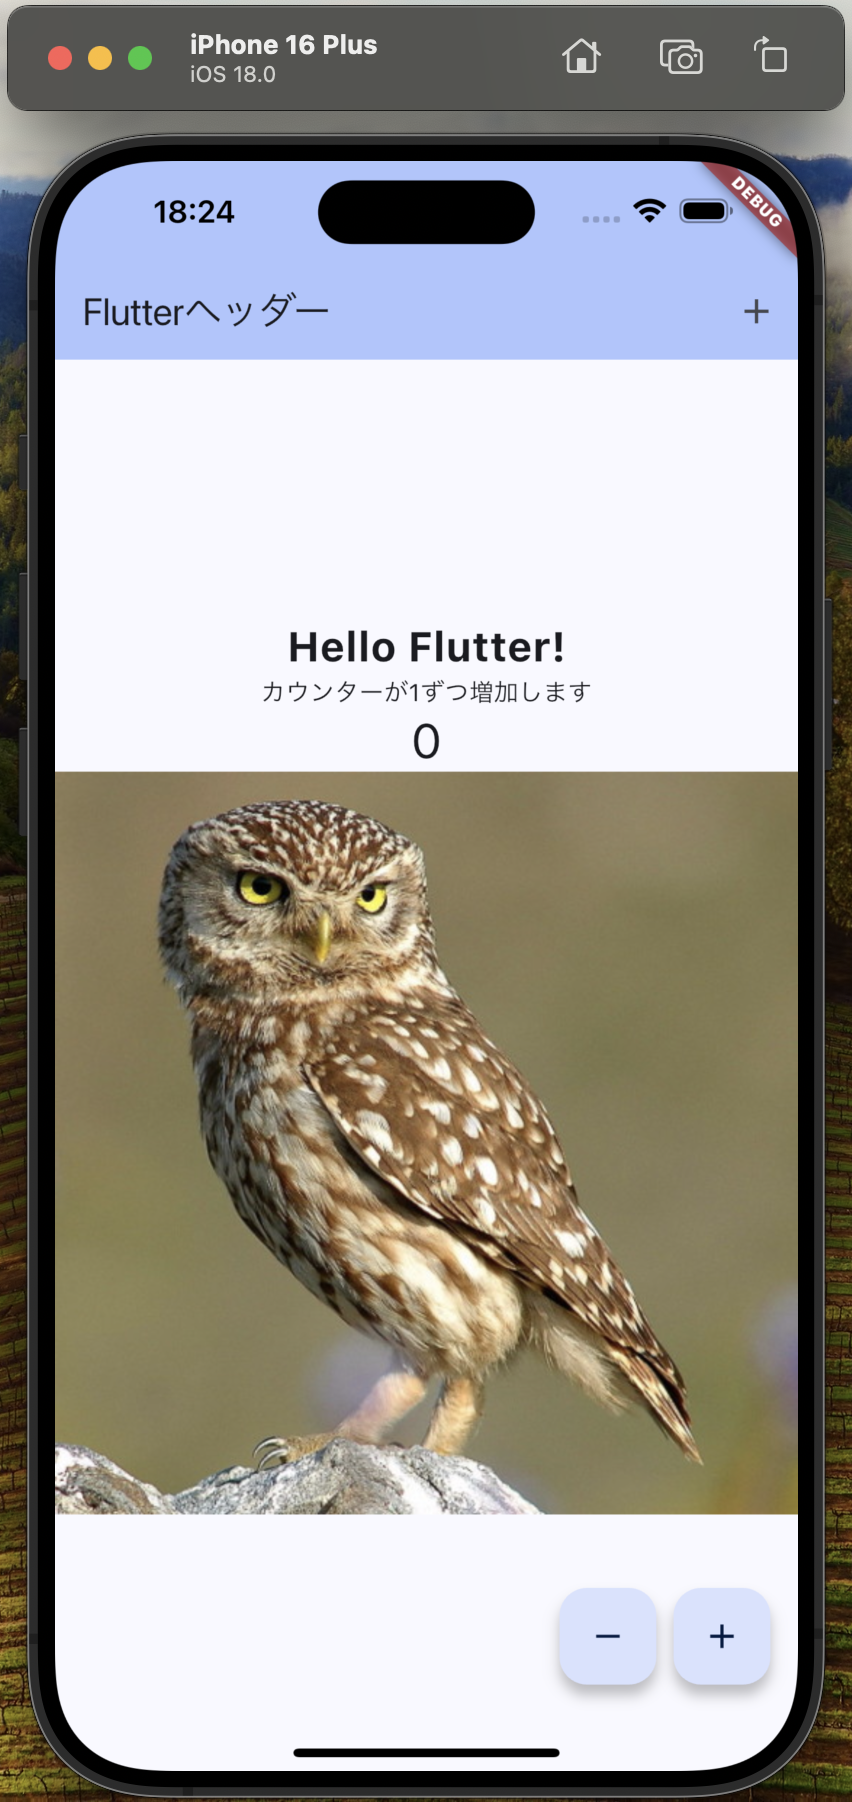
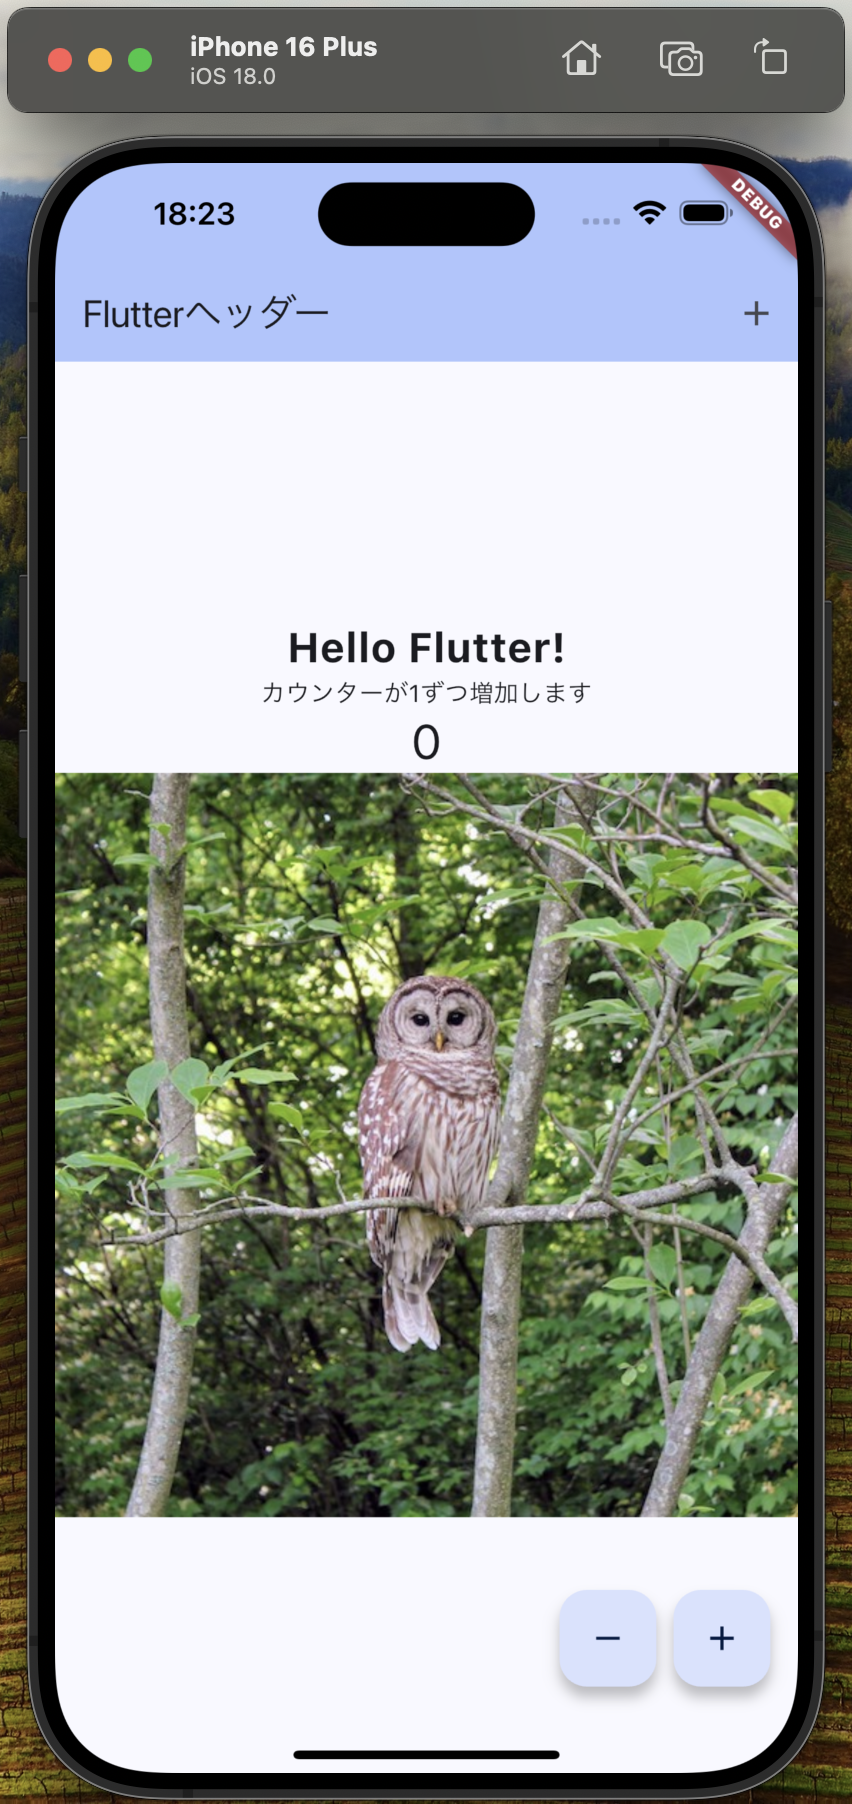
),ショートカットのコンストラクタを使用する場合
ショートカットのコンストラクタを使用する場合、以下のように記載することができます。Image.networkは、インターネット上の画像を表示するためのショートカットコンストラクタで、簡潔にコードを書くことができます。
Image.network(
'https://flutter.github.io/assets-for-api-docs/assets/widgets/owl-2.jpg')実装後イメージ
アプリケーション内にある画像の表示
次はアプリケーション内にある画像の表示方法について見ていきます。
1. assetsディレクトリの作成
% mkdir assets2. assetsディレクトリ内に画像を配置
先ほど作成したassetsディレクトリに適当な画像を配置します。
your_flutter_project/
├── assets/
│   └── images/
│       └── sample.png
├── lib/
│   └── main.dart
└── pubspec.yaml
3. pubspec.ymlの編集
flutter:
  uses-material-design: true
  assets:
    - assets/images/sample.png
4. Widgetに配置
pubspec.ymlで読み込んだ画像をWidgetに配置します。今回はbodyの中にあるカウンター表示部分の下に配置します。
body: Center(
  child: Column(
    mainAxisAlignment: MainAxisAlignment.center,
    children: <Widget>[
      const Text(
        'Hello Flutter!',
        style: TextStyle(
          fontSize: 24,
          fontWeight: FontWeight.bold,
        ),
      ),
      const Text(
        'カウンターが1ずつ増加します',
      ),
      Text(
        '$_counter',
        style: Theme.of(context).textTheme.headlineMedium,
      ),
      const SizedBox(height: 20), // テキストと画像の間にスペースを追加
      Image.asset('assets/images/sample.png'), // 画像を追加
    ],
  ),
),
5. 表示確認
シミュレーターを起動し、画像が表示されるか確認します。

画像の加工
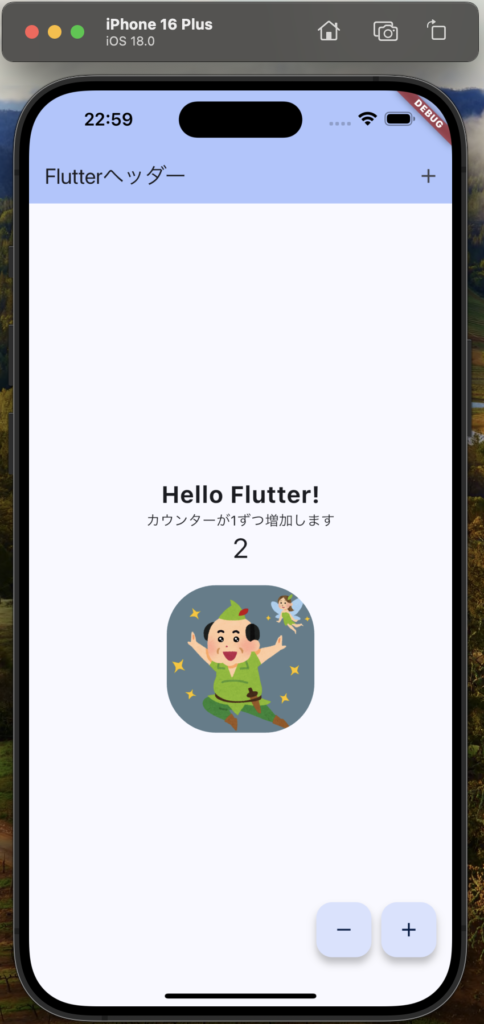
角丸の切り抜き
画像を角丸にするには、ClipRRect Widgetを使用して画像を切り抜きます。ClipRRectにはborderRadiusプロパティがあり、これを使って角を丸めることができます。
body: Center(
  child: Column(
    mainAxisAlignment: MainAxisAlignment.center,
    children: <Widget>[
      const Text(
        'Hello Flutter!',
        style: TextStyle(
          fontSize: 24,
          fontWeight: FontWeight.bold,
        ),
      ),
      const Text(
        'カウンターが1ずつ増加します',
      ),
      Text(
        '$_counter',
        style: Theme.of(context).textTheme.headlineMedium,
      ),
      const SizedBox(height: 20), // テキストと画像の間にスペースを追加
      ClipRRect(
        borderRadius: BorderRadius.circular(50),
        child: Container(
          color: Colors.blueGrey,
          width: 150,
          height: 150,
          child: Image.asset(
            'assets/images/sample.png',
            width: 300,
            height: 300,
          ),
        )
      ),
    ],
  ),
),
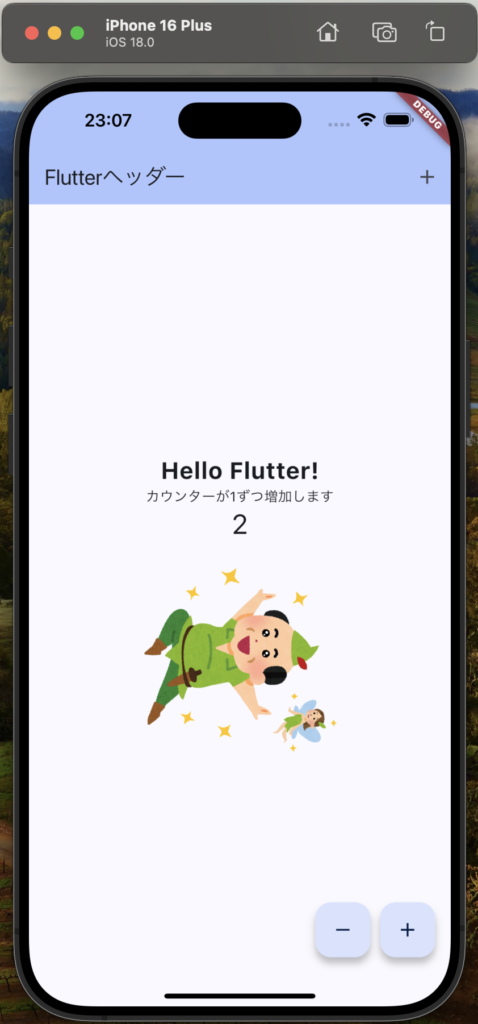
画像の回転
画像を回転させるにはRotatedBoxを使用することができます。
body: Center(
  child: Column(
    mainAxisAlignment: MainAxisAlignment.center,
    children: <Widget>[
      const Text(
        'Hello Flutter!',
        style: TextStyle(
          fontSize: 24,
          fontWeight: FontWeight.bold,
        ),
      ),
      const Text(
        'カウンターが1ずつ増加します',
      ),
      Text(
        '$_counter',
        style: Theme.of(context).textTheme.headlineMedium,
      ),
      const SizedBox(height: 20), // テキストと画像の間にスペースを追加
      RotatedBox(
        quarterTurns: 1, // 90度回転
        child: Image.asset(
          'assets/images/sample.png',
          width: 200,
          height: 200,
        ),
      ),
    ],
  ),
),
まとめ
- Imageのデフォルトコンストラクタを使用し、ImageProviderとしてNetworkImageを指定することで画像表示ができる
- Image.networkを使用して、シンプルにネットワーク画像を表示することもできる
- アプリケーション内の画像表示では
pubspec.yamlに画像パスを指定し、Image.assetで画像を表示する - ClipRRectを使用し、borderRadiusで画像の角を丸めることが可能
- RotatedBoxを使用し、90度単位で画像を回転することが可能
参考
今回はFlutterアプリケーションで画像表示と画像加工について簡単にまとめました。画像関連はまだまだ奥が深い部分なので、適宜記事にまとめていこうと思います。