今回はRails5から追加された機能「APIモード」について初心者向けに解説したいと思います。APIと聞くと難しいイメージを持たれる方も多いとは思いますが、RailsのAPIモードを用いることで簡単に実装することができます。
APIモードの実装には、APIをテストすることができる「Talend API Tester」を用いています。「Talend API Tester」を知らない、使ったことがない方はこちらの記事を参考にしてください。

そもそもAPIとは
APIとは「Application Programming Interface」の頭文字を取ったもので、アプリケーションの一部を切り取り、外部に向けて公開されたもののことです。
APIとはソフトウェアやアプリケーションなどの一部を外部に向けて公開することにより、第三者が開発したソフトウェアと機能を共有できるようにしてくれるものです。
APIについてはこちらの記事に詳しくまとめています。
Rails APIモードとは
Rails APIモードとは、API作成に特化したモードのことです。
APIモードではMVCのV(ビュー)が存在しないため、rails newを実行した際にビューに関するファイルやGemが生成されません。
source 'https://rubygems.org'
git_source(:github) { |repo| "https://github.com/#{repo}.git" }

ruby '2.6.5'

# Bundle edge Rails instead: gem 'rails', github: 'rails/rails'
gem 'rails', '~> 6.0.3', '>= 6.0.3.5'
# Use mysql as the database for Active Record
gem 'mysql2', '>= 0.4.4'
# Use Puma as the app server
gem 'puma', '~> 4.1'
# Use SCSS for stylesheets
gem 'sass-rails', '>= 6'
# Transpile app-like JavaScript. Read more: https://github.com/rails/webpacker
gem 'webpacker', '~> 4.0'
# Turbolinks makes navigating your web application faster. Read more: https://github.com/turbolinks/turbolinks
gem 'turbolinks', '~> 5'
# Build JSON APIs with ease. Read more: https://github.com/rails/jbuilder
gem 'jbuilder', '~> 2.7'
# Use Redis adapter to run Action Cable in production
# gem 'redis', '~> 4.0'
# Use Active Model has_secure_password
# gem 'bcrypt', '~> 3.1.7'

# Use Active Storage variant
# gem 'image_processing', '~> 1.2'

# Reduces boot times through caching; required in config/boot.rb
gem 'bootsnap', '>= 1.4.2', require: false

group :development, :test do
  # Call 'byebug' anywhere in the code to stop execution and get a debugger console
  gem 'byebug', platforms: [:mri, :mingw, :x64_mingw]
end

group :development do
  # Access an interactive console on exception pages or by calling 'console' anywhere in the code.
  gem 'web-console', '>= 3.3.0'
  gem 'listen', '~> 3.2'
  # Spring speeds up development by keeping your application running in the background. Read more: https://github.com/rails/spring
  gem 'spring'
  gem 'spring-watcher-listen', '~> 2.0.0'
end

group :test do
  # Adds support for Capybara system testing and selenium driver
  gem 'capybara', '>= 2.15'
  gem 'selenium-webdriver'
  # Easy installation and use of web drivers to run system tests with browsers
  gem 'webdrivers'
end

# Windows does not include zoneinfo files, so bundle the tzinfo-data gem
gem 'tzinfo-data', platforms: [:mingw, :mswin, :x64_mingw, :jruby]
source 'https://rubygems.org'
git_source(:github) { |repo| "https://github.com/#{repo}.git" }

ruby '2.6.5'

# Bundle edge Rails instead: gem 'rails', github: 'rails/rails'
gem 'rails', '~> 6.0.3', '>= 6.0.3.5'
# Use mysql as the database for Active Record
gem 'mysql2', '>= 0.4.4'
# Use Puma as the app server
gem 'puma', '~> 4.1'
# Build JSON APIs with ease. Read more: https://github.com/rails/jbuilder
# gem 'jbuilder', '~> 2.7'
# Use Redis adapter to run Action Cable in production
# gem 'redis', '~> 4.0'
# Use Active Model has_secure_password
# gem 'bcrypt', '~> 3.1.7'

# Use Active Storage variant
# gem 'image_processing', '~> 1.2'

# Reduces boot times through caching; required in config/boot.rb
gem 'bootsnap', '>= 1.4.2', require: false

# Use Rack CORS for handling Cross-Origin Resource Sharing (CORS), making cross-origin AJAX possible
# gem 'rack-cors'

group :development, :test do
  # Call 'byebug' anywhere in the code to stop execution and get a debugger console
  gem 'byebug', platforms: [:mri, :mingw, :x64_mingw]
end

group :development do
  gem 'listen', '~> 3.2'
  # Spring speeds up development by keeping your application running in the background. Read more: https://github.com/rails/spring
  gem 'spring'
  gem 'spring-watcher-listen', '~> 2.0.0'
end

# Windows does not include zoneinfo files, so bundle the tzinfo-data gem
gem 'tzinfo-data', platforms: [:mingw, :mswin, :x64_mingw, :jruby]
上記の比較をすると分かる通り、APIモードでは以下のGemが生成されません。
- saas-rails
- webpacker
- turbolinks
- webconsole
- capybara
- selenium-webdriver
- webdrivers
また通常のRailsアプリケーションではerbファイルをレスポンスとして返しますが、APIモードではJSONをレスポンスに返します。「APIモード = JSONを返すモード」という認識でも良いのかもしれません。
APIモードを立ち上げてみる
では実際にRailsのAPIモードを使ってみましょう。
今回はユーザーの一覧表示とユーザーの新規作成機能をAPIモードで作っていきます。
新規アプリケーションの立ち上げ
まずは以下のコマンドを打ち込み、新規アプリケーションを立ち上げましょう。「–api」を末尾に付けることでAPIモードでのアプリケーション作成が行われます。
データベースの作成も同時に行っておきます。
% rails new api-test -d mysql --api
% rails db:create
アプリケーション名: api-test
Ruby: 2.6.5
Rails: 6.0.3.5
データベース: MySQL
コントローラーの作成と編集
続いてコントローラーの作成です。
以下のコマンドを打ち込み、users_controller.rbを作成しましょう。
% rails g controller users
作成したusers_controller.rbを以下のように編集します。今回はCRUDのC(Create)とR(Read)のみを扱うため、indexアクションとcreateアクションのみを記述します。
class UsersController < ApplicationController
  def index
    users = User.all
    render json: { data: users }
  end

  def create
    user = User.new(user_params)
    if user.save
      render json: user, status: :created
    else
      render json: user.errors, status: :unprocessable_entity
    end
  end

  private

  def user_params
    params.permit(:name)
  end
end
モデルの作成
次はモデルの作成です。
以下のコマンドを打ち込み、string型のnameカラムを持ったモデルを作成しましょう。
マイグレートも同時に行っておきます。
% rails g model user name:string
% rails db:migrate
ルーティングの編集
続いてはルーティングの編集です。
以下のようにindexアクションとcreateアクションのルーティングを設定しましょう。
Rails.application.routes.draw do
  resources :users, only: %i[index create]
end
データの登録
最後にコンソールからダミーデータを登録しておきます。
% rails c
> User.create(name: 'テストくん')
> User.create(name: 'テストさん')
> User.create(name: 'テストちゃん')
> exit
ここまででアプリケーション側の設定は完了です。
rails serverを実行し、アプリケーションを起動させておきましょう。
APIを叩いてみる
ここからは「Talend API Tester」を用いてAPIを叩き、リクエストとレスポンスが正常に送られるか確認してみます。
Talend API Testerの設定・使い方はこちら
GETメソッド(indexアクション)
GETメソッドのレスポンスを確認する手順は以下になります。
- 「GET」を選択
- 「http://localhost:3000/users」を入力
- 「Send」をクリック
- レスポンスを確認
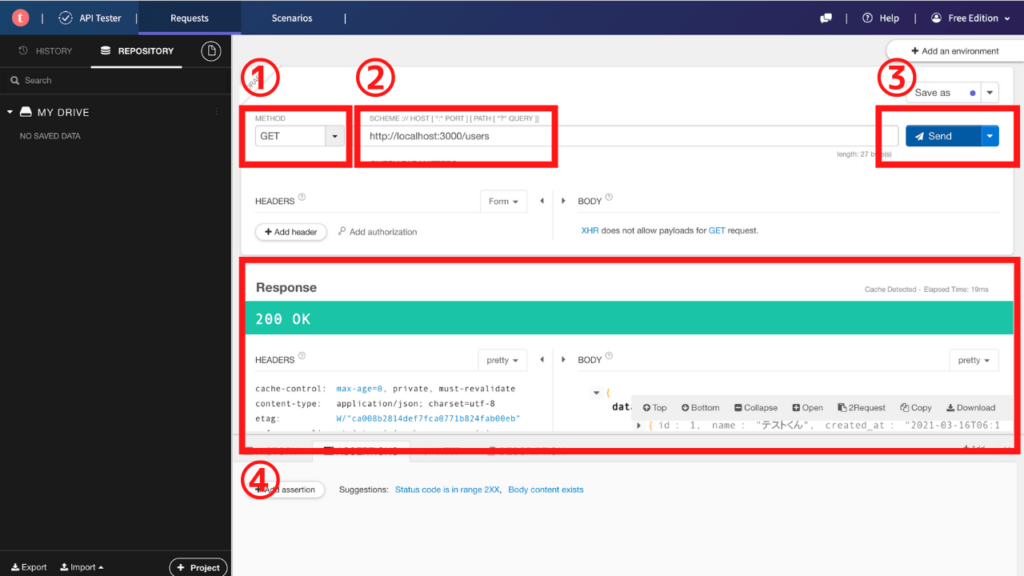
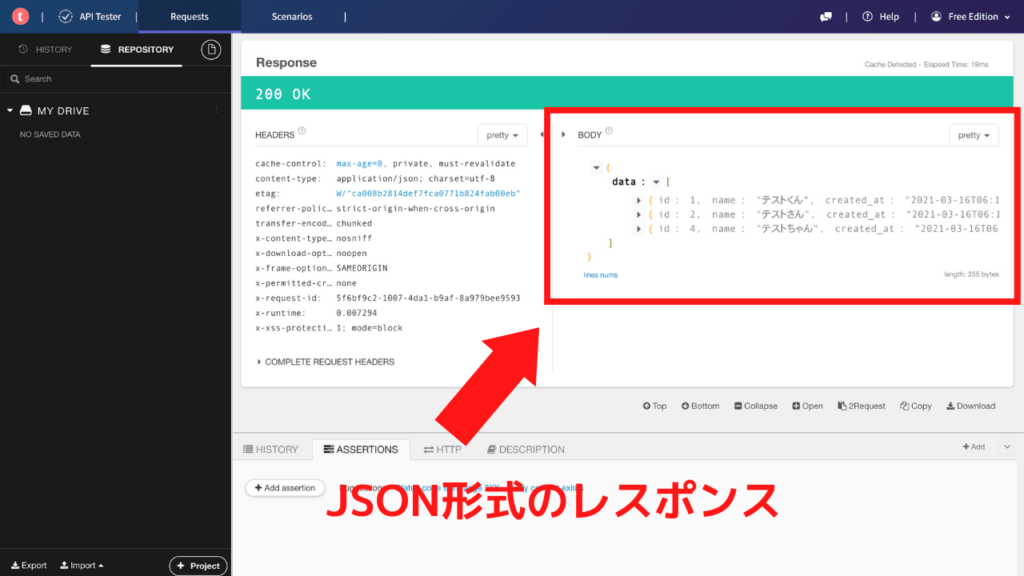
レスポンスを確認すると、登録したデータがJSON形式で返ってきているはずです。
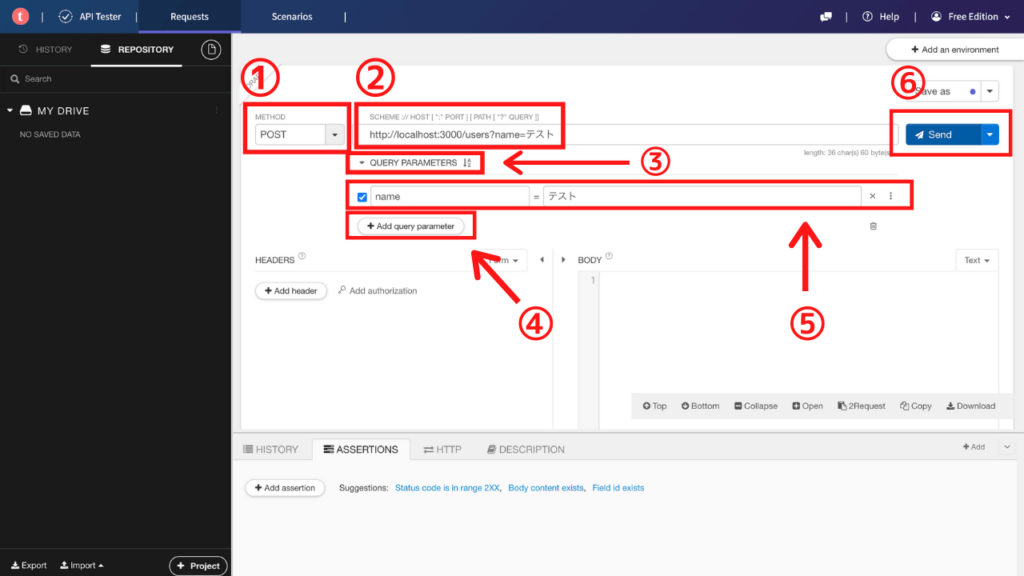
POSTメソッド(createアクション)
POSTメソッドでリクエストを送る手順は以下になります。
- 「POST」を選択
- 「http://localhost:3000/users」を入力
- 「QUERY PARAMETERS」を選択
- 「+ Add query parameters」を選択
- キーはname、値はテストと入力
- 「Send」をクリック
レスポンスを確認すると以下のようになっているはずです。
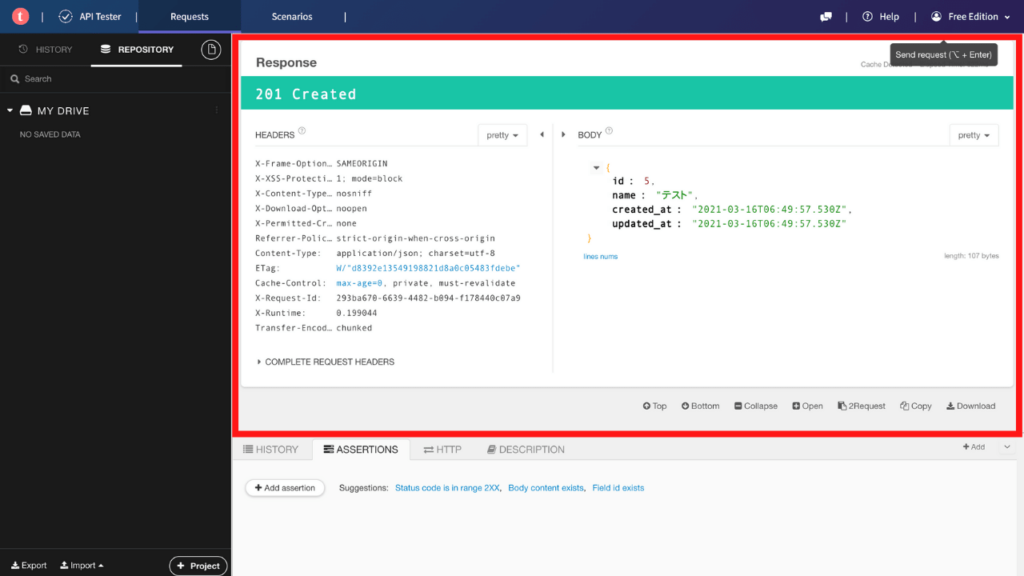
このように「Talend API Tester」を用いることでリクエストとレスポンスを確認することができます。CRUDのU(Update)とD(Delete)も同様に確認することができるので、ぜひ試してみてください。
まとめ
- Rails APIモードとは、API作成に特化したモードのこと
- APIモードではMVCのVが存在しないため、rails newを実行した際にVに関するファイルやGemが生成されない
- APIモードではJSONをレスポンスとして返す
- 「–api」を末尾に付けることでAPIモードでのアプリケーション作成が行われる
- 「Talend API Tester」を用いることでリクエストとレスポンスを確認することが可能
参考
今回はRails5から追加された機能「APIモード」について解説しました。APIを気軽に実装できるのでおすすめの機能の1つです。ぜひご自身でも実装してみてください。