今回はgem ‘slack-notifier’を使用したSlack通知機能を簡易実装してみたので紹介したいと思います。アカウント削除や予期しないエラーなど、重要なアクションをいち早くキャッチしたい場合に役立つ方法の1つになります。
↓ Slack通知実装で用いる機能の参考記事

Slack通知の実装手順
Slack側
まずは以下のURLにアクセスし、メッセージを投稿したいチャンネルを選択します。選択後「Incoming Webhook インテグレーションの追加」をクリックしましょう。
↓ ↓ ↓
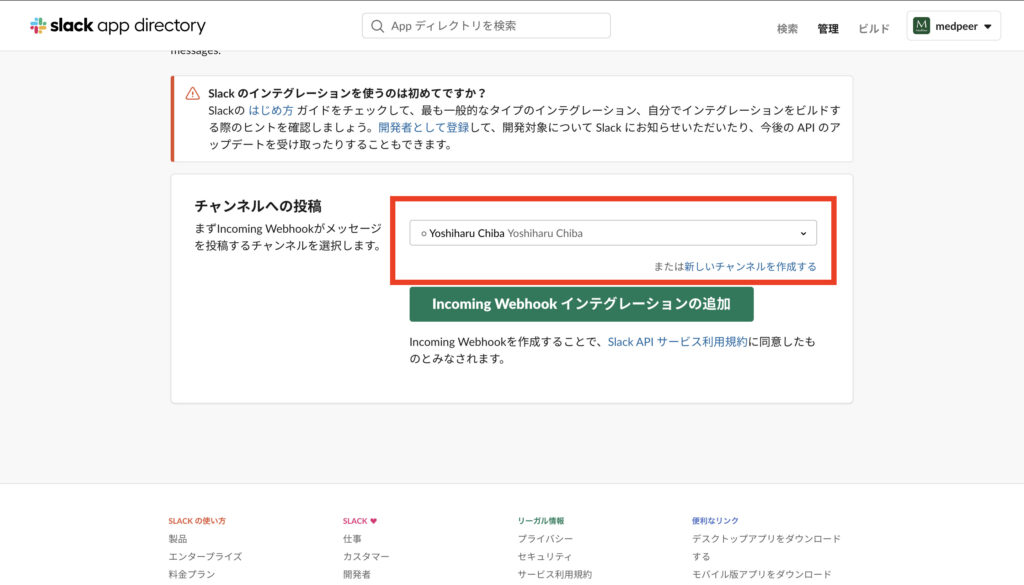
Webhook URLをコピーしてSlack側の設定は完了です。
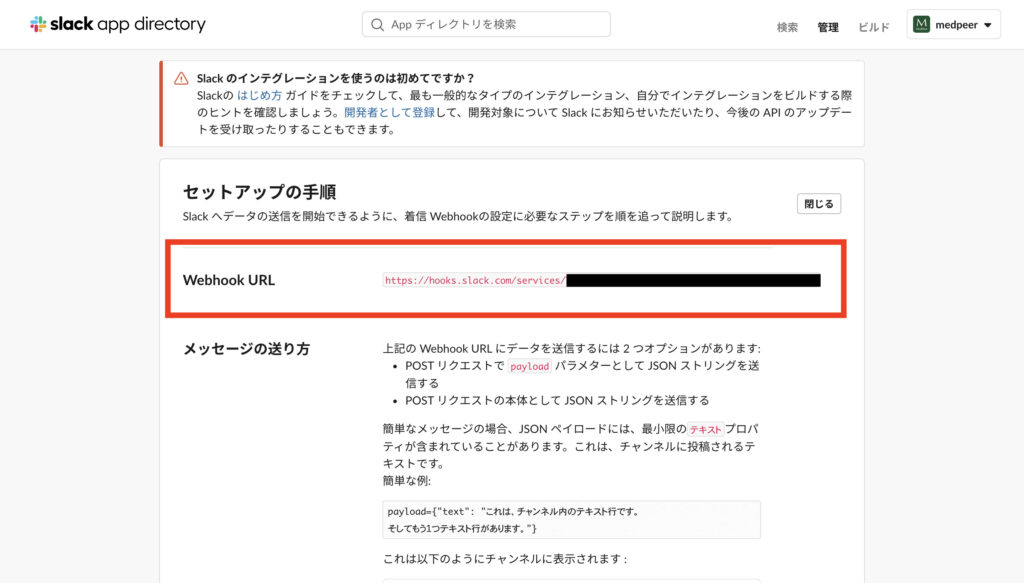
設定が完了すると、選択したチャンネルにインテグレーションが追加された旨が通知されているはずです。

アプリケーション側
まずはrails newで新規アプリケーションを作成し、scaffoldでユーザーに関するファイルを一括生成します。
% rails new slack-notification-app -d mysql
% rails db:create
% rails g scaffold user name:string
% rails db:migrate
今回開発するアプリケーションの環境は以下のようになります。
- アプリケーション名:slack-notification-app
- Rails:6.0.4.1
- Ruby:2.6.5
- DB:MySQL
続いて、Slack通知を実装できるGem ‘slack-notifier’をインストールします。
gem 'slack-notifier'% bundle install
今回はユーザー作成時とユーザー作成失敗時、ユーザー削除時にSlackに通知が飛ぶように設定します。以下のようにWEBHOOK_URL(Slack側の設定でコピーしたURL)とnotifier、pingを設定します。
class UsersController < ApplicationController
  WEBHOOK_URL = 'https://hooks.slack.com/services/...'

  # 省略

  # POST /users or /users.json
  def create
    @user = User.new(user_params)

    respond_to do |format|
      if @user.save
        notifier.ping "ユーザーが作成されました。"
        format.html { redirect_to @user, notice: "User was successfully created." }
        format.json { render :show, status: :created, location: @user }
      else
        notifier.ping "ユーザーの作成に失敗しました。"
        format.html { render :new, status: :unprocessable_entity }
        format.json { render json: @user.errors, status: :unprocessable_entity }
      end
    end
  end

  # 省略

  # DELETE /users/1 or /users/1.json
  def destroy
    @user.destroy
    respond_to do |format|
      notifier.ping "ユーザーが削除されました。"
      format.html { redirect_to users_url, notice: "User was successfully destroyed." }
      format.json { head :no_content }
    end
  end

  # 省略

  private

  def notifier
    Slack::Notifier.new(WEBHOOK_URL, username: '通知Bot', icon_emoji: ':sunglasses:')
  end
end
以下のコードでSlack通知の設定をすることができます。newの引数にはusername(通知時の名前)やchannel(ワークスペースのチャンネル名)、icon_emoji / icon_url(通知時のアイコン)を指定することができます。
WEBHOOK_URL = 'https://hooks.slack.com/services/...'
Slack::Notifier.new(WEBHOOK_URL)
上記で設定したSlack通知は、pingメソッドを指定することでメッセージと一緒に送信することができます。
Slack::Notifier.new(WEBHOOK_URL).ping('メッセージ内容をここに記載')
ここまででSlack通知の実装が完了したので、実際に通知が行われるか確認してみます。サーバーを起動し「http://localhost:3000/users/new」にアクセスした後、ユーザーを作成してみましょう。
作成が完了すると、設定していたSlackのチャンネルに通知が飛んでいるはずです。

ユーザー削除時も同様です。

またpingメソッドに「<!channel>」や「<!here>」を追記することで、チャンネル参加者全員に通知を飛ばすことができます。
# DELETE /users/1 or /users/1.json
def destroy
  @user.destroy
  respond_to do |format|
    notifier.ping "<!here> ユーザーが削除されました。"
    format.html { redirect_to users_url, notice: "User was successfully destroyed." }
    format.json { head :no_content }
  end
end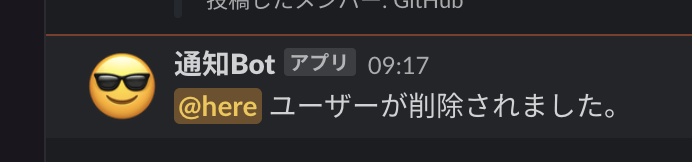
Webhook URLをCredentialsで管理する
現在Webhook URLはコントローラーに直書きしていますが、このままではセキュリティ上良くありません。こういった秘匿情報を管理する仕組みであるcredentials.yml.encを用いて、Webhook URLを管理してみましょう。
まずは以下のコマンドを打ち込み、vimでcredentials.yml.encを開きます。
% EDITOR=vi bin/rails credentials:edit
開いたcredentials.yml.encにWebhook URLを追記します。
webhook_url: 'https://hooks.slack.com/services/...'

# aws:
#   access_key_id: 123
#   secret_access_key: 345
コントローラーのWebhook URL部分を以下のように置き換えます。これでWebhook URLを隠した状態でSlack通知機能を実装することができました。
class UsersController < ApplicationController
  before_action :set_user, only: %i[ show edit update destroy ]

  WEBHOOK_URL = Rails.application.credentials[:webhook_url]

  # 省略
end
digメソッドを使用して、Webhook URLを取得することも可能です。
Rails.application.credentials.dig(:webhook_url)Slack通知を飛ばす環境を指定する
全ての環境(development, test, staging, prduction)でSlack通知を実装する必要はないため、Slack通知が飛ぶ環境を指定したいと思います。今回はdevelopmentとproduction環境でのみSlack通知が飛ぶように設定してみます。
環境の指定にはRails::Application.config_forを用いてyml形式で設定します。
config以下にapplication.ymlを作成し、共通の設定であるdefaultとdevelopment環境、production環境をそれぞれ記載します。
% touch config/application.yml# config/application.yml
# 共通の設定
default: &default
# 開発環境の設定
development:
# 本番環境の設定
production:
default部分にcredentialsからWebhook URLを読み込む記述を追加し、development環境とproduction環境ではそのdefaultを上書きする形に修正します。
# config/application.yml

# 共通の設定
default: &default
  webhook_url: <%= Rails.application.credentials[:webhook_url] %>

# 開発環境の設定
development:
  <<: *default

# 本番環境の設定
production:
  <<: *default
defaultを上書きしない場合は以下のような形になります。
# config/application.yml

# 共通の設定
default: &default

# 開発環境の設定
development:
  webhook_url: <%= Rails.application.credentials[:webhook_url] %>

# 本番環境の設定
production:
  webhook_url: <%= Rails.application.credentials[:webhook_url] %>
application.rbに作成したapplication.ymlを読み込む記述を追記します。
require_relative 'boot'

require 'rails/all'

# Require the gems listed in Gemfile, including any gems
# you've limited to :test, :development, or :production.
Bundler.require(*Rails.groups)

module SlackNotificationApp
  class Application < Rails::Application
    # Initialize configuration defaults for originally generated Rails version.
    config.load_defaults 6.0

    # Settings in config/environments/* take precedence over those specified here.
    # Application configuration can go into files in config/initializers
    # -- all .rb files in that directory are automatically loaded after loading
    # the framework and any gems in your application.

    config.x.app = config_for(:application) ← 追記
  end
end
最後にコントローラーを以下のように編集しましょう。具体的には、application.ymlを通してcredentialsに記載のWebhook URLを取得するよう修正しました。
class UsersController < ApplicationController

  # 省略

  # POST /users or /users.json
  def create
    @user = User.new(user_params)

    respond_to do |format|
      if @user.save
        notifier.ping "ユーザーが作成されました。"
        format.html { redirect_to @user, notice: "User was successfully created." }
        format.json { render :show, status: :created, location: @user }
      else
        notifier.ping "ユーザーの作成に失敗しました。"
        format.html { render :new, status: :unprocessable_entity }
        format.json { render json: @user.errors, status: :unprocessable_entity }
      end
    end
  end

  # 省略

  # DELETE /users/1 or /users/1.json
  def destroy
    @user.destroy
    respond_to do |format|
      notifier.ping "ユーザーが削除されました。"
      format.html { redirect_to users_url, notice: "User was successfully destroyed." }
      format.json { head :no_content }
    end
  end

  # 省略

  private

  def notifier
    url = Rails.configuration.x.app.webhook_url # 追記
    Slack::Notifier.new(url, username: '通知Bot', icon_emoji: ':sunglasses:')
  end
end
まとめ
- slack-notifierはSlack通知機能を実装することができるGem
- Slack通知機能を実装するにはWebhook URLを取得する必要がある
- Slack::Notifier.new(WEBHOOK_URL)でSlack通知を飛ばすことができる
- newの引数にはusername(通知時の名前)やchannel(ワークスペースのチャンネル名)、icon_emoji / icon_url(通知時のアイコン)を指定することができる
- Slack::Notifier.new(WEBHOOK_URL).ping(‘メッセージ内容をここに記載’)のように、pingメソッドを指定することでメッセージと一緒に送信することができる
- pingメソッドに「<!channel>」や「<!here>」を追記することで、チャンネル参加者全員に通知を飛ばすことができる
- Webhook URLは秘匿情報のため、Credentialsで管理するのがベター
- Slack通知機能の環境を制限する場合は、Rails::Application.config_forを用いる
参考
今回はgem ‘slack-notifier’を使用したSlack通知機能を簡易実装してみたので紹介しました。Slack通知機能を実装し、重要なアクションが行われた際はいち早くその情報をキャッチできるようにしましょう。